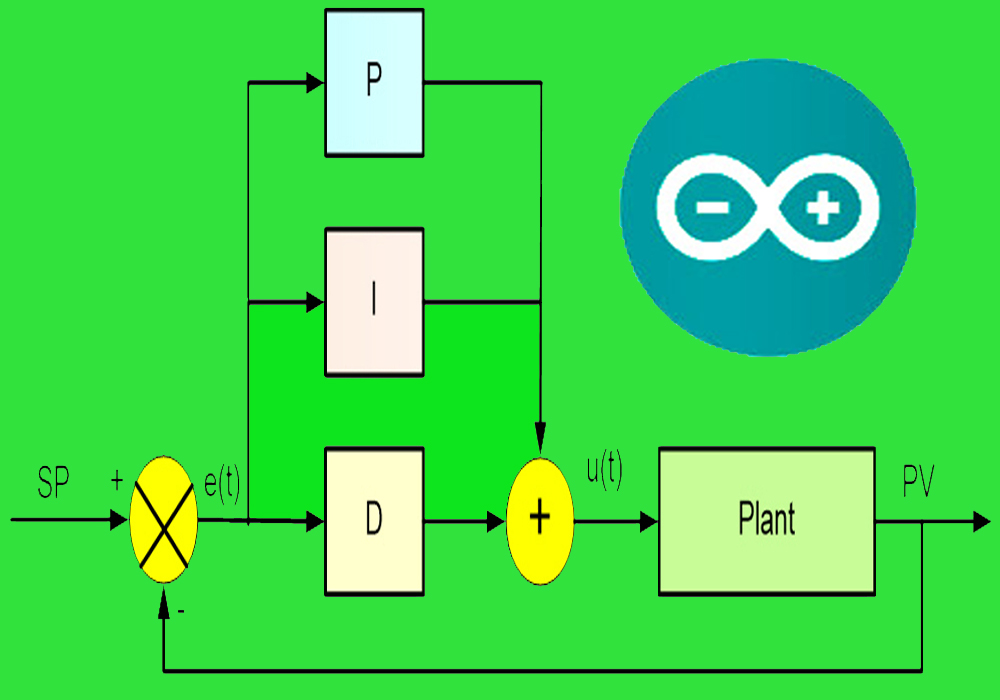
Pemantauan Suhu Via IoT Menggunakan PID-iTCLab

Perangkat yang diperlukan:
- Aplikasi : IoT MQTT Panel di HP Android
- Cloud IoT sebagai Broker MQTT : hivemq.com
- Device : Menggunakan Kit iTCLab

Berikut ini contoh program yang harus diupload ke Kit iTCLab:
/***********************************************
 * Program : Pemantauan Suhu dengan PID via IoT
 *           Menggunakan Kit iTCLab
 * Oleh    : Tim io-t.net
 * Surabaya, 20 April 2022
 ***********************************************/

#include <WiFi.h>
#include <PubSubClient.h>
#include <Arduino.h>

const char* ssid = "wifi"; // Enter your WiFi name
const char* password =  "Password_wifi"; // Enter WiFi password

#define mqttServer "broker.hivemq.com"
#define mqttPort 1883

WiFiServer server(80);
WiFiClient espClient;
PubSubClient client(espClient);

String Topic;
String Payload;

// constants
const int baud = 115200;       // serial baud rate

// pin numbers corresponding to signals on the iTCLab Shield
const int pinT1   = 34;         // T1
const int pinT2   = 35;         // T2
const int pinQ1   = 32;         // Q1
const int pinQ2   = 33;         // Q2
const int pinLED  = 26;         // LED

// setting PWM properties
const int freq = 5000; //5000
const int ledChannel = 0;
const int Q1Channel = 1;
const int Q2Channel = 2;
const int resolutionLedChannel = 8; //Resolution 8, 10, 12, 15
const int resolutionQ1Channel = 8; //Resolution 8, 10, 12, 15
const int resolutionQ2Channel = 8; //Resolution 8, 10, 12, 15

float cel, cel1, degC, degC1;
float P, I, D, Kc, tauI, tauD;
float KP, KI, KD, op0, ophi, oplo, error, dpv;
float sp = 35, //set point
pv = 0,        //current temperature
pv_last = 0,   //prior temperature
ierr = 0,      //integral error
dt = 0,        //time between measurements
op = 0;        //PID controller output
unsigned long ts = 0, new_ts = 0; //timestamp
const float batas_suhu_atas = 58;

// global variables
float Q1 = 0;                 // value written to Q1 pin
float Q2 = 0;                 // value written to Q2 pin
int iwrite_value = 25;        // integer value for writing
int iwrite_led = 255;         // integer value for writing
int iwrite_min = 0;           // integer value for writing

void setup() {
  // put your setup code here, to run once:

  ts = millis();

  Serial.begin(baud);
  while (!Serial) {
    ; // wait for serial port to connect.
  }

  // configure pinQ1 PWM functionalitites
  ledcSetup(Q1Channel, freq, resolutionQ1Channel);

  // attach the channel to the pinQ1 to be controlled
  ledcAttachPin(pinQ1, Q1Channel);

  // configure pinQ2 PWM functionalitites
  ledcSetup(Q2Channel, freq, resolutionQ2Channel);

  // attach the channel to the pinQ2 to be controlled
  ledcAttachPin(pinQ2, Q2Channel);

  // configure pinLED PWM functionalitites
  ledcSetup(ledChannel, freq, resolutionLedChannel);

  // attach the channel to the pinLED to be controlled
  ledcAttachPin(pinLED, ledChannel);

  ledcWrite(Q1Channel,0);
  ledcWrite(Q2Channel,0);
  ledcWrite(ledChannel,0);

  // Connect to WiFi network
  Serial.println();
  Serial.println();
  Serial.print("Connecting to ");
  Serial.println(ssid);
  WiFi.begin(ssid, password);

  while (WiFi.status() != WL_CONNECTED) {
    delay(500);
    Serial.print(".");
  }
  Serial.println("");
  Serial.println("WiFi connected");

  // Connect to Server IoT (CloudMQTT)
  client.setServer(mqttServer, mqttPort);
  client.setCallback(receivedCallback);

  while (!client.connected()) {
    Serial.println("Connecting to MQTT Broker ...");

//    if (client.connect("ESP32Client", mqttUser, mqttPassword )) {
     if (client.connect("iTCLab Suhu dengan Kendali PID...")) {

      Serial.println("connected");
      Serial.print("Message received: ");

    } else {
      Serial.print("failed with state ");
      Serial.print(client.state());
      delay(2000);
    }
    //client.subscribe("heater1");
    //client.subscribe("heater2");
  }
}

void Q1on(){
    ledcWrite(Q1Channel,iwrite_value);
    //Serial.println(Q1);
}

void Q1off(){
    ledcWrite(Q1Channel,iwrite_min);
    //Serial.println(Q1);
}

void Q2on(){
    ledcWrite(Q2Channel,iwrite_value);
    //Serial.println(Q2);
}

void Q2off(){
    ledcWrite(Q2Channel,iwrite_min);
    //Serial.println(Q2);
}

void ledon(){
    ledcWrite(ledChannel,iwrite_led);
}

void ledoff(){
    ledcWrite(ledChannel,iwrite_min);
}

void cektemp(){
  degC = analogRead(pinT1) * 0.322265625 ;    // use for 3.3v AREF
  cel = degC/10;
  degC1 = analogRead(pinT2) * 0.322265625 ;    // use for 3.3v AREF
  cel1 = degC1/10;

  Serial.print("Temperature T1: ");
  Serial.print(cel);   // print the temperature T1 in Celsius
  Serial.print("°C");
  Serial.print("  ~  "); // separator between Celsius and Fahrenheit
  Serial.print("Temperature T2: ");
  Serial.print(cel1);   // print the temperature T2 in Celsius
  Serial.println("°C");
}

// PID Controller
// inputs -----------------------------------
// sp = setpoint
// pv = current temperature
// pv_last = prior temperature
// ierr = integral error
// dt = time increment between measurements
// outputs ----------------------------------
// op = output of the PID controller
// P = proportional contribution
// I = integral contribution
// D = derivative contribution

float pid(float sp, float pv, float pv_last, float& ierr, float dt) {
  float Kc = 10.0; // K / %Heater
  float tauI = 50.0; // sec
  float tauD = 1.0;  // sec
  // PID coefficients
  float KP = Kc;
  float KI = Kc / tauI;
  float KD = Kc*tauD;
  // upper and lower bounds on heater level
  float ophi = 100;
  float oplo = 0;
  // calculate the error
  float error = sp - pv;
  // calculate the integral error
  ierr = ierr + KI * error * dt;
  // calculate the measurement derivative
  float dpv = (pv - pv_last) / dt;
  // calculate the PID output
  float P = KP * error; //proportional contribution
  float I = ierr; //integral contribution
  float D = -KD * dpv; //derivative contribution
  float op = P + I + D;
  // implement anti-reset windup
  if ((op < oplo) || (op > ophi)) {
    I = I - KI * error * dt;
    // clip output
    op = max(oplo, min(ophi, op));
  }
  ierr = I;
  Serial.println("sp="+String(sp) + " pv=" + String(pv) + " dt=" + String(dt) + " op=" + String(op) + " P=" + String(P) + " I=" + String(I) + " D=" + String(D));
  return op;
}

void receivedCallback(char* topic, byte* payload, unsigned int length) {

/* we got '1' -> Q1_on */
  if ((char)payload[0] == '1') {
        Q1on();
        Serial.println("Q1 On");
  }

/* we got '2' -> Q1_off */
  if ((char)payload[0] == '2') {
        Q1off();
        Serial.println("Q1 Off");
  }

/* we got '3' -> Q2_on */
  if ((char)payload[0] == '3') {
        Q2on();
        Serial.println("Q2 On");
  }

/* we got '4' -> Q2_off */
  if ((char)payload[0] == '4') {
        Q2off();
        Serial.println("Q2 Off");
  }
}

void loop() {
  // put your main code here, to run repeatedly:
  new_ts = millis();
  if (new_ts - ts > 1000) {
  char suhu1[4];
  char suhu2[4];
  char SetPoint[4];
  char Nilai_op[4];

  client.loop();

  cektemp();
  if (cel > batas_suhu_atas){
    Q1off();
    ledon();
  }
  else {
    Q1on();
    ledoff();
  }
  if (cel1 > batas_suhu_atas){
    Q2off();
    ledon();
  }
  else {
    Q2on();
    ledoff();
  }

  pv = cel;   // Temperature T1
  dt = (new_ts - ts) / 1000.0;
  ts = new_ts;
  op = pid(sp,pv,pv_last,ierr,dt);
  ledcWrite(Q1Channel,op);
  pv_last = pv;

  dtostrf(cel, 1, 0, suhu1);
  client.publish("Suhu1",suhu1);

  dtostrf(sp, 1, 0, SetPoint);
  client.publish("SetPoint",SetPoint);

  dtostrf(op, 1, 0, Nilai_op);
  client.publish("Nilai_op",Nilai_op);

  delay (200);

  dtostrf(cel1, 1, 0, suhu2);
  client.publish("Suhu2",suhu2);

  delay (200);
  }
}
Download Program Monitoring dan Kontrol Suhu Basic via IoT dalam Arduino (silahkan klik-kanan Save link as), di sini : 08-IoT_PID_Monitor.ino.
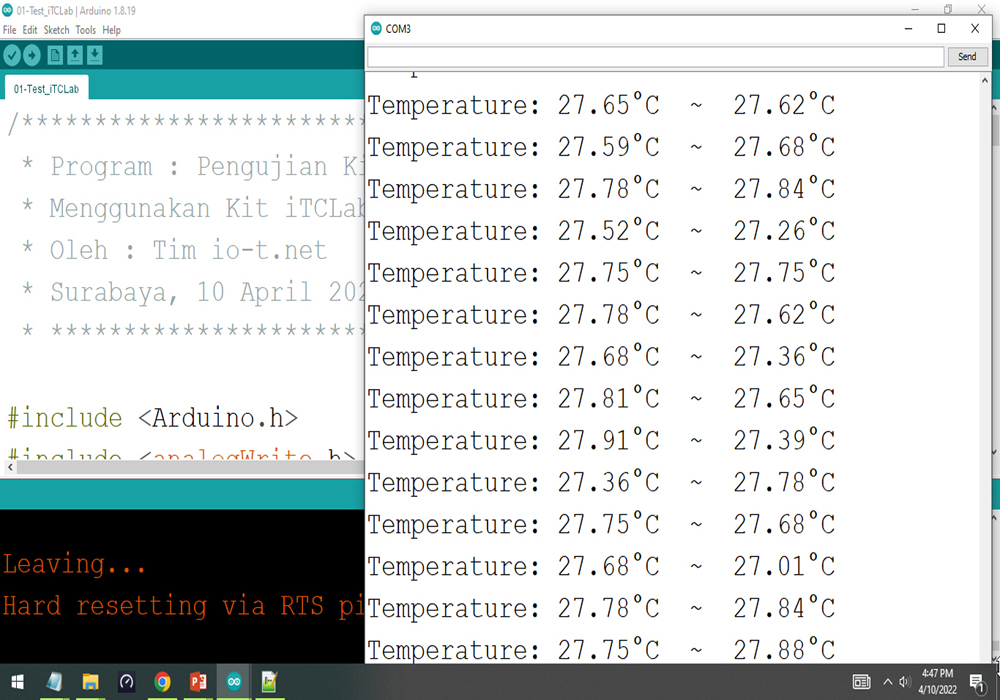
Tampilan melalui Serial Monitor di laptop, seperti terlihat pada gambar berikut:

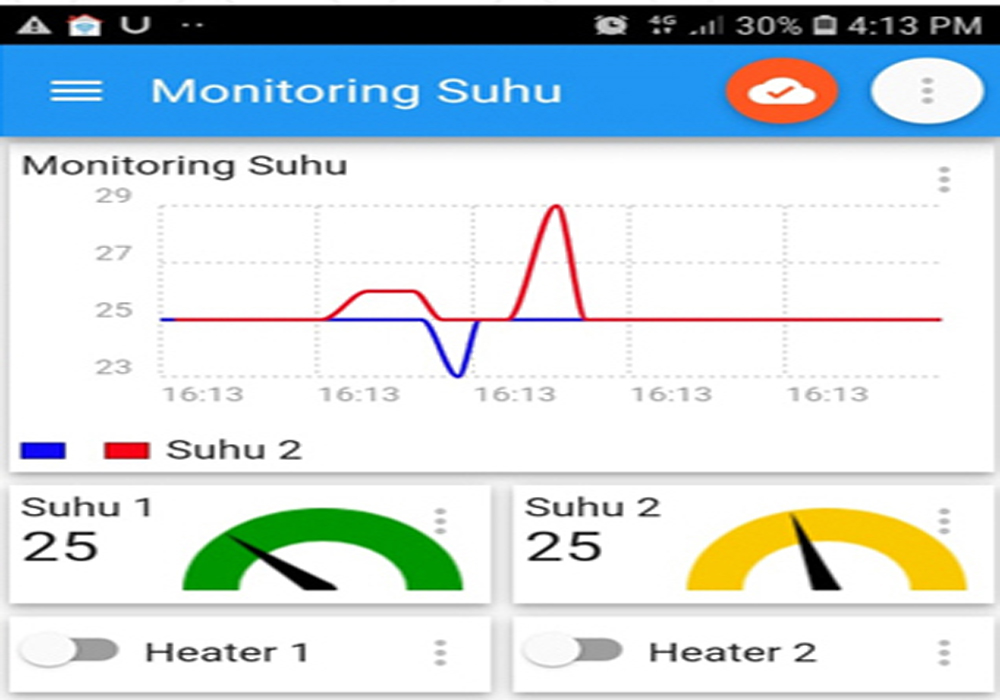
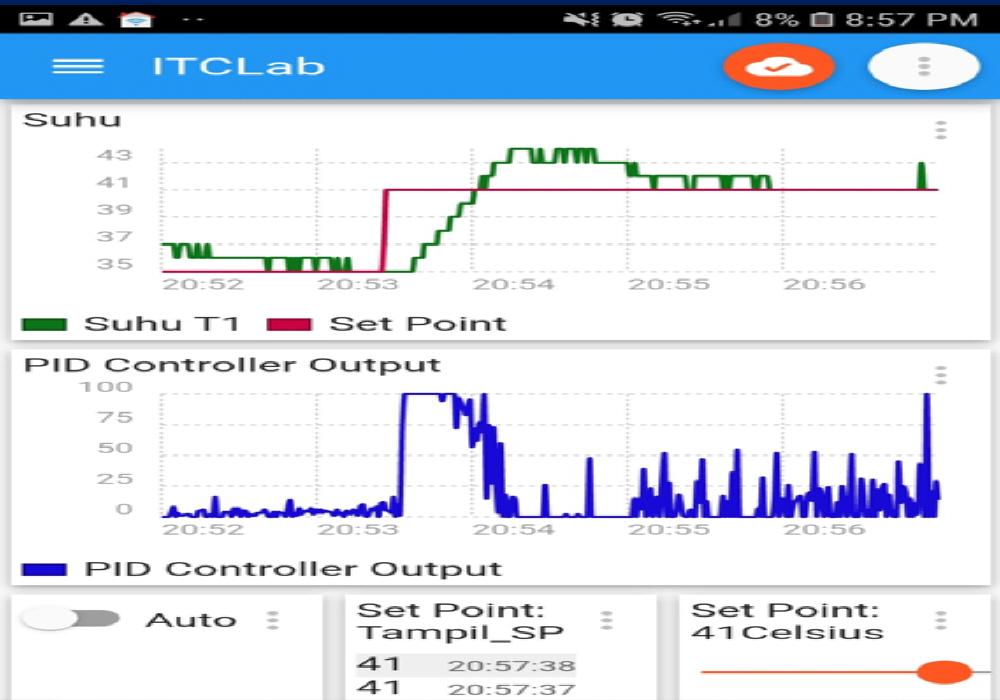
Seting pada HP Android, menggunakan IoT MQTT Panel sebagai berikut:


Jika berhasil konek ke Broker MQTT, maka hasilnya adalah sebagai berikut: